Posted on 6 Comments

12 IKEA Products for Pottery

Here are 12 of my favourite Ikea products that I use in my pottery studio. If you are an amateur home ceramicist or a fully fledged studio potter, these Ikea products are going to come in handy to ease your pottery making. Here I share my favourite Ikea hacks from storage ideas to tools for making and glazing.

1. SORTERA Waste sorting bins £9 for 60l and £6 for 37l

ikea waste sorting bins pottery clay bins

These Plastic bins are great for storing scrap clay yet to be recycled. For a larger scale pottery they are the perfect option to store glaze materials as well. These are also stackable so they will help save floorspace in your studio which is essential for every ceramics studio.

2. SAMLA Insert for Box £3

insert box handy pottery tools storage

This handled box is great for tool storage to store and then bring with you to your pottery class or move around with you in your studio. I have separate ones labelled for throwing, trimming and glazing which makes life easy when you manage to have hundreds of little tools for every and any job in the studio. And the cherry on the top is that they easily wiped clean. Happy days!

3. SOCKERBIT Storage box with lid £12

ikea storage box for clay storage

These under-bed storage boxes are great for the studio. They are great to slowly dry out your greenware pottery to minimise cracks and warping in the kiln later on. Store them under shelving or desks and just forget about them until your pottery is ready to bring out to bisque fire.

Otherwise they are perfect for storing balled up clay ready for throwing the next day.

4. HEJNE Softwood shelving 3 sections/shelves £88

ikea softwood shelving for pottery studio storage

This is the shelving I use in my studio and I absolutely bloody love it! Sturdy, easy to assemble and you can continue to add on the sides. You also decide how many shelves you insert and the height of each shelf. Think about how tall your work tends to be when thrown when deciding the number of shelves. Fairly wide at 50cm, these are ideal to use to store freshly thrown work and store bisque work as well. I recommend buying the plastic feet to go on the bottom to keep from water damage in often damp pottery studios.

5. HYLLIS Shelving unit with cover £13

ikea shelving unit for drying pottery

These garden units are great for storing greenware to slowing dry out. I use them all the time as my pottery that I apply piped clay onto needs extra time for the water content to balance out so these units are great to dry them out slowly. They help reduce cracks and warping also in the bisque kiln. The shelves are quite tall for my work but I tend to stack the clay pieces so this is fine. The cover is essential to keep moisture in at a small cost.

6. RÅSKOG Trolley £39

ikea trolley for storing pottery tools

These are great to store your many, many tools and keep by you when you are working on your clay work. Wheel around your studio between your wheel and your work bench/desk to keep it easy.

7. VARIERA Plastic bag dispenser £1.50

plastic bag storage for storage handy plastic bags in pottery studio

These are a life-saver in the studio. I store all of my plastic bags in here to wrap work up at the end of each work day. I need about 3 more of these to store all my different sized plastic bags. And at £1.50 they are a bloody bargain!

8. MAGASIN Rolling pin £3.50

ikea rolling pin

Cheap and cheerful rolling pin for slab work. I find that these rolling pins with this kind of handle design where the barrel moves independently from the handles are much more useful compared to the traditional rolling pins that are made from one single piece of wood. I find you can get more pressure and an even slab with this design and ultimately you can roll out clay better.

9. GUBBRÖRA Rubber spatula £1

ikea spatula

I use these when making glazes. I can stir the glaze ingredients in with the water and then get every bit out when sieving the new glaze with the rubbery end. An essential when making glazes. I have 3!

10. FULLÄNDAD Ladle £0.75

ikea ladle

I use this ladle to glaze taller pieces that I can’t dip. I ladle in glaze to coat the inside then tip out glaze. Then hold the piece upside down with glazing tongs and using the ladle pour the glaze over the outside of the piece and back into the bucket.

11. BEVARA sealing clips set of 30 £1.50

ikea sealing clips

I keep a lot of my glaze material in the original plastic bags they come in. Once I cut the cable ties off, I use these sealing clips to enclose the materials in the bag. Which is perfect at keeping the bags sealed and reducing dust in your studio.

12. ANTAGEN dish-washing brush £0.50

ikea dishwashing brush

These dish-washing brushes are great for glaze stirring. If you have a stubborn glaze that collects heavy at the bottom of your bucket try these brushes to stir and break up the glaze at the bottom. A handy addition!

By Christina Goodall

Read my other blog posts here.

www.christinagoodallceramics.com

www.facebook.com/christinagoodallceramics

www.instagram.com/christinagoodallceramics

Posted on Leave a comment

My 6 Go-to Pottery Throwing Tools

Here are 6 tools I can’t go without when sitting down to throw (as well as my pottery wheel of course!) I’ll let you in on my tried and true favourites. All of these products are available online if you think they might help you throwing those clay shapes.

1. Ribs – These ones aren’t made out of bone but instead wood, metal and plastic. My favourites are the mud tools ribs that come in a variety of shapes and colour-coded flexibilities. I use the The ‘Very soft’ Red Shape 1, The ‘Soft Flex’ Yellow Shape 2 and The ‘Medium Flex’ Green Shape 4.

The Red one is great for the initial pulling and shaping, this super flexible rib is easier to work with the soft clay.

The Yellow one is more rigid, I find this better for cleaning up the shape of the thrown shape and removing all that clay slip. That sharp right angle lets you clean up the base as well.

I find the Green one is better to use when trimming, the harder polymer can actually scape the clay and act as a trimming tool to clean up and smooth the surface. I even use it as a burnishing tool on leather hard clay. Buy directly from Mudtools or most clay suppliers including Bath Potters and Scarva.

Red Mudtools throwing rib

MUDTOOLS Shape 1 Rib

I’ve also used wooden ribs which depending on the type of wood, can swell and degrade. I find the best way to avoid this is to steer clear of ribs made of ‘Boxwood’ and instead go for a hardwood or bamboo.

There are also ribs that can create some fun textures and shapes. I use a bamboo throwing rib from Bathpotters that gives a neat and clean bee hive shape.

bamboo pottery rib

Bamboo Throwing Rib

Also you can use Cake decorating cake scrapers, used to scrape icing away from the surface of a cake to create patterns. I bought a set from amazon and the result can be very good. They are almost awkwardly too tall but the variety in one set is fun to play around with.

2. Diddler – A strange name for a sponge on the end of a stick but there you go. Diddlers are helpful because they allow you to remove water from a vessel when the vessel is too narrow to remove it by hand with an ordinary sponge. They also allow you to remove some of the clay slip from the internal wall. Yes they are a simple design, but sometimes the best tools are. Here is the one I use.

3. Callipers

These are great when your’e creating lidded vessels like jars and teapots to accurately measure the lid to fit the rim or internal gallery. There is no need to remember measurements like would need to do with a ruler as the measurement can be screwed tight in place. Also if you’re aiming to throw multiples and you want them to be a specific width or height, go ahead and use callipers. There are several types available online at varying price points.

4. Needle tool

MUDTOOLS Needle Tool

5. Mirror

Any mirror will do! Put a mirror up in front of you when throwing. Angle it so that you can see your hands on the wheel, so that when throwing you have vision of the side of your pot as well as your bird’s eye view from above. This way you don’t have to move your body too much when throwing to look at the side while pulling and shaping. You can just look to your mirror.

6. Hand cream

It’s easy to dry out your hands when throwing as a potter. The constant rinsing of hands, as well the silica and grog in clay is lightly abrasive. Glazes as well can act as an irritant on the skin, due to the dust, acids and alkalis that can be present. This can lead to ‘work-related dermatitis’ which causes painfully sore skin (so try to wear latex gloves when glazing). I use hand cream before I start working, as needed during the day and then at the end of the day. O’Keef’s Working Hands Hand Cream is my preferred choice at the moment. I find it moisturises my skin well, soaks in quickly and doesn’t feel oily.

Many thanks for reading!

By Christina Goodall

www.christinagoodallceramics.com

www.facebook.com/christinagoodallceramics

www.instagram.com/christinagoodallceramics

Posted on Leave a comment

My 10 Go-to Glazing Tools

Christina Goodall Pottery blog glazing post

Glazing might be my least favourite part of making pottery (okay, I actually hate it) and I often heard other potters say the same thing. Glazing can certainly be frustrating to say the least. You make this lovely clay vessel/object and then you fire it once, it survives and looks great so far but then you go and coat it in a glaze you think you know pretty well. Then comes that fateful day when you open the kiln and that glaze has dripped all over the kiln shelf; or cracked; or shivered or pin-holed or whatever. You internally scream because you spent hours on this and it has come out wrong. It’s so frustrating.

But I’ve come to know a few ways to minimise these frustrations. These are my 10 Go-to Glazing tools to help you out.

Glazing tongs

These are my go-to tools as I dip most of my ceramics. I have two different types, both are more suited to glazing certain shaped vessels.

www.claymansupplies.co.uk/Products/Miscellaneous_Tools/6393Sponge

www.scarva.com/en/Scarva-Tools-Glazing-Tongs—Soft-Plastic-Grip-Handle/m-1075.aspx

Essential all-rounder for any pottery! Its all about quantity not quality with this one. I have so many cheap sponges in the studio because they are useful for every stage of making pottery. In glazing, I use them to clean up any spillage and also to wipe pottery bottoms (a MUST! even if they have been waxed) as you don’t want your lovely pot to be to come out of the kiln

Studio safety is essential! Dust inhalation is no joke! So a Respirator is a good investment in every pottery studio. During glazing, glaze dries quickly on bisque work and can cause dust in the air and spilled glaze should be wiped up while still wet to deter glaze dust in the studio. Glazes are made of glass and clay dust as well as metal

Wax and Latex

Essential if you want more control on how much of the foot ring is left unglazed. This might be extra important if you have a glaze that drops (and you want to save your kiln shelves!) Use wax or latex as a resist to resist your glaze and keep your foot ring clean. I find wax is better at resisting glaze but is near on impossible to remove from the surface if you apply a bit of a wonky line or accidental drip. Latex if applied too thin can tare or ripple to allow glaze through, this easy to fix with a damp sponge by just wiping clean. Also you can easily remove by peeling off.

www.scarva.com/en/Scarva-Raw-Materials-Wax-Emulsion–Resist/m-148.aspx

www.scarva.com/en/Scarva-Special-Effects-Liquid-Latex-Emulsion/m-3055.aspx

Ladle

New favourite tool! Really helpful to cover vessels that are too tall to dip glaze. To glaze the outside, I hold the vessel with my Glazing tongs upside down, ladle the freshly whisked up glaze over the ceramic back into the bucket.

www.ikea.com/gb/en/p/fullaendad-soup-ladle-grey-80393089/

Funnel

Very useful for glazing the inside of vessels. Especially pots with a small neck or rim. Just place and ladle in your whisked glaze into the funnel. I fill about half the vessel, then while holding my pot slowly pouring the glaze out whilst also turning the vessel. This covers the the entire inside of your pot.

www.ikea.com/gb/en/p/chosigt-funnel-set-of-2-assorted-colours-70153179/

Slip trailers

These are great if you want to experiment with layering your glazes. I also use them to glaze any missed spots of fiddly pottery that can be sometimes hard to glaze like teapots.

www.bathpotters.co.uk/slip-trailer-medium-100cc

Metal kidney

A cheap and very useful tool that every potter probably already has; this can also be used at the glazing stage of your pottery making. When dipping your pottery in glaze, it may have caused runs on your pot. Allow the glaze to fully dry and become powdery. Then take your metal kidney tool and lightly scrape the raised glaze run until it is even to the rest of the surface. Then gently smooth out with your finger.

www.bathpotters.co.uk/extra-flexible-steel-clay-scraper-medium

Glaze stirrer

A easy and cheap option to stir up your glaze to disturb the heavier materials from the bottom. Mixing up all the ingredients so that all the ingredients (of different weights) are evenly dispersed throughout the glaze is very important so that you don’t use up lighter (weight) materials on the top and leave all the heavier materials at the bottom.

The only thing is, if you use glazes that sit heavier at the bottom you might want to instead go for a more industrial option of a drill and paint stirrer.

www.bathpotters.co.uk/black-plastic-glaze-stirrer

Drill and paint mixer

A more expensive tool but well worth it. This will thoroughly stir any glaze with ease in seconds. An investment would be to buy a good quality drill and then a cheap paint stirrer/paddle from any DIY store. My main piece of advice? Do not let your drill overheat.

Epsom Salts

Also known as magnesium sulfate. Can be used as an easily accessible and cheap flocculant.

The flocculent thickens the glaze, by charging particles so that they gel together and attract to each other. This helps all the components in the suspend in the water more easily. It also helps the glaze drip less easily and stay put on your bisque wares.

Use approximately 30g dissolved in 100ml of warm water.

Respirator

Studio safety is essential! Dust inhalation is no joke! So a Respirator is a good investment in every pottery studio. During glazing, glaze dries quickly on bisque work and can cause dust in the air and spilled glaze should be wiped up while still wet to deter glaze dust in the studio. Glazes are made of glass and clay dust as well as metals that can be toxic if inhaled.

www.screwfix.com/p/gvs-elipse-half-mask-respirator-p3/6922g

Let me know what your favourite tools are when it comes to glazing and maybe we can all start to enjoy glazing – maybe!

Many thanks for reading!

By Christina Goodall

www.christinagoodallceramics.com

www.facebook.com/christinagoodallceramics

www.instagram.com/christinagoodallceramics

Posted on Leave a comment

5 Cake Decorating Tools for Clay

Specialist pottery tools can be expensive and when you need a tool for every task in pottery making, price can quickly add up. So Cake decorating tools can be a good investment when many of them can so easily be utilised to decorate clay pieces and they are often cheaper in comparison. They can also be great fun to experiment with and produce a unique decoration on your clay creations! Amazon, Craft shops and local kitchenware providers are useful places to source these new tools.

Piping Nozzles

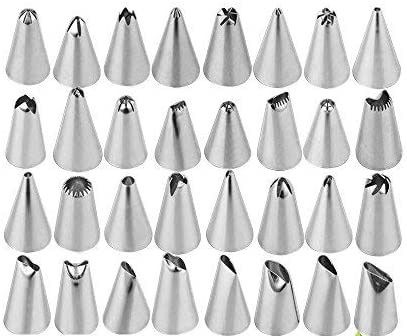
Piping clay is one of my favourite decorating technique, there is a variety of nozzles available but I recommend to buy a full set as it is helpful to experiment with as many as you can (and you will need the piping bags). One thing to consider is the added texture should be carefully positioned onto functional pieces for hygiene reasons. However on decorative work feel free to experiment. It can take a lot of practice to produce piping that your’e happy with. Learning to apply the correct amount of pressure takes time as clay slip is a different consistency to buttercream or frosting.

The clay slip that I use is first dried, then soaked and sieved. I allow this to dry to a consistency that I’m happy with to begin piping. Drying work with clay piping on it is the most crucial step because the slip has a high water content compared to the wall of the vessel you have applied it to, it will need to be dried slowly so the water content can even out so covering with plastic is a good idea.

Variety of nozzles in a piping set for cake decorating

Cake Icing Comb

These are an alternative to pattern ribs used to shape the profile of clay when throwing on the potter’s wheel. There are sets with several designs that can be fun to experiment with and can create some great results. They tend to be a bit too tall for my use so I have cut mine down (carefully with an electric jigsaw then sanded to smooth). They can also be applied to hand building to add texture by scraping while the clay work is on a whirler. I found my set on amazon.

Cake icing combs cake decorating icing frosting white purple

Different Cake Icing Combs

Chocolate and Sugar Craft Moulds

These silicone moulds are similar to plaster sprig moulds but there is a lot more variety. A disadvantage of the cake decorating moulds is that the clay relief from the mould is harder to release because silicone cannot absorb water like plaster sprig moulds. They are still useful to give a uniform repeat motif you can use in your work again and again. The Cake Decorating Company has a large selection of moulds.

I have even made my own moulds using sealant silicone from the DIY shop. You can shape and carve your design into clay and pump a layer of silicone on top, allow to dry and it’s ready to use. This allows you to create an entirely custom and unique motif to use in your work.

Cake silicone mould cake decorating gold design baroque

‘The Cake Decorating Company’ Baroque Silicone Mould

Cookie cutters

Cookie cutters are a great options to start you off. Roll out your clay to about half a centimetre on an unvarnished wood base like plywood (so the clay does not stick). Lift the clay slab off carefully each time you roll over it. Then compress the clay with a metal rib over the slab.

There is such a huge variety of cutters available, usually plastic or metal. Stainless steel is better as it’s sharper than plastic and does not rust. Maybe choose a design that you like for all year round, not just for Christmas. Bird designs are a great option and they would look good outside too in your garden. Be careful to push out the clay from a cutter that has thin sections with a paint brush so it doesn’t get stuck and break off. One design I enjoy using is this rocking horse cutter for Christmas Events from Lakeland. There are also plenty of cutter you can find online, just pick your favourite and start rolling out those slabs!

Cookie cutter rocking horse biscuit stainless steel cake decorating

‘Lakeland’ Rocking Horse Cookie Cutter

Meri Meri have some gorgeous trendy designs like these Cactus cutters to create single hanging decorations or even bunting. Once cut out, make sure to cut a hole at the top to hang. Decorate as desired, for example you can could experiment with textures, stains, underglaze and slips.

Meri Meri Cookie Cutters Cactus green steel Party

‘Meri Meri’ Cactus Cookie Cutters

Cake Whirlers

Whirlers are essential for hand-building and useful when decorating clay pieces. It is useful to centre the work like on a potter’s wheel and then you can turn the clay work to decorate in a fluid movement. Cake turntables to ice and decorate cakes are a great cheaper alternative to potter’s whirlers. Plastic Cake turntables tend to range from £10 -£20 where as metal potters whirlers/banding wheels range £50 – £100+

Hobbycraft and Lakeland both have options for sale.

Cake decorating whirler plastic white scallop edge

Cake Decorating Whirler

Many thanks for reading my first EVER blog post!

By Christina Goodall

www.christinagoodallceramics.com

www.facebook.com/christinagoodallceramics

www.instagram.com/christinagoodallceramics